


Over the past 2 months I have been working with Ease Education trialing their A3 light panel in my classroom and I am pleased to say that I have a newfound love for this resource. Don’t get me wrong, it is not quite up there with my love of tuff trays just yet, but it is on its’ way and I would definitely place it in my top 10 resource wish list for an ASD classroom. I believe in giving my honest opinion and review of anything that I use in my classroom, especially if I am going to recommend it to others so here are a few of my thoughts:
- From a novelty and sensory aspect, the children have been very much engaged by and interested in using this resource. Because of the increase in engagement and interest, children are even more inclined to attend to and focus on the activities that I set up on it and this alone is reason enough for me to recommend it.
- The light/brightness can be adjusted very easily with the touch screen on/off button meaning that even those who may be averse to brighter lights can enjoy using it on duller light settings.
- The size (A3) makes it very practical to use around the classroom. It is light and portable (once you have sockets dotted around your room!) and the children enjoy using it in various areas; sensory room, classroom and black out tent (which has a very handy slot in the bottom of it to allow for cables/plugs to fit through!)
- These are often sold or marketed as a sensory resource but I have loved using it as a 'hook; to increase in children’s attention and motivate them to participate in a range of cross-curricular activities which you will see below.
Things to consider when purchasing or considering using one in your classroom:
- As it is a plug-in light panel, you do need to have access to nearby sockets.
- The cable is quite short, which can make it difficult to use in different areas in the classroom if you don’t have sockets dotted around the room however as a static station/area it is perfect. (Tip: Ikea tables make a perfect static station table!)
- The screen is slimline and delicate and so I would emphasise the need for establishing and practising appropriate usage of the light panel with your children.
- When I used liquid or water elements with the light panel I did this more as a modelling activity that the children watched rather than as them setting it up (for safety reasons). Super to increase engagement and attention skills both in small group and large group sessions.
- The light panel I have is A3 in size and my children were happy to use it individually or in pairs. It was also large enough for me to model sensory activities for larger groups but if you want the children to be hands on in these sessions, I would recommend getting multiple panels or a larger one that more children could share as a group!
Now back to the practicalities of using it in the classroom. As many of you will know, I have a wide age and ability range in my class so it is always important to me that I can adapt and differentiate the same tasks to suit the needs and levels of the children that I work with whether that is through the level of questioning or the outcome I hope to achieve with them. I used this light panel to support and engage children in a range of tasks such as Fine Motor Skills, Maths, Phonics, Imaginative Play Skills as well as Language Development and Sensory Play. You will see how language is built into all of these areas and not simply a standalone session, while still keeping the task as cross curricular opportunities in essence. Modelling and using functional language in an informal way like this is, for me, the best and most natural way to develop language skills in our everyday environment. Below I share a few of the elements we might work on with each set up as well as some extension activities that may help you to differentiate for differing levels in your class.
https://www.ease.ie/collections/light-panels-accessories/products/a2-sized-light-panel
Here’s a little insight into how we have used them in our class over the past couple of months:

Fine Motor Skills, Maths, Play Skills, Imaginative Play, SESE.
Using the Perspex cubes to create skylines, buildings, towers, etc as flat lay pictures against the light back drop or building them up as 3D models (again working on our stacking skills). We had great fun adding some Lego characters for children to play with which also helps to engage and encourage imaginative play. Lots of opportunities for modelling language, focusing on subject specific language, discussion and questioning throughout these tasks. What colour is this building? How many cubes are in the blue/green building? How many cubes did you use altogether? Which is the tallest/shortest building? How much taller is the blue than the yellow building? Which towers are the same height?
Extension: Ask children to choose their favourite colour and create a block graph, create some colour pattern buildings (2 and 3 colour repeating patterns) or even investigate 3D solids.: Discuss what 3D solid this is? Investigate cubes and their properties (faces, corners, edges, etc).
Stacking helps to develop hand-eye co-ordination, visual perception and bilateral co-ordination skills when using both hands to stack. Easy to incorporate play skills, language, questioning and challenges: How high can you build it? How many cubes do you think you can stack? (Estimation and prediction.) A great opportunity to develop Math language skills by comparing heights, using comparison language of shorter/taller, shortest/tallest as well as exploring and naming colours. Can you create a colour pattern stack? How can we make it more stable? Why is it wobbly? Can we measure how high our towers are with a ruler/metre stick?
Extension: How many cubes can you stack in 1 minute? Who can stack the tallest tower in one minute? How much taller/smaller is your tower than mine? Add in some SESE: Where might we find towers? Who might live/work in a tower like this? Do we have buildings like this in our village? Why? Why not?

Maths, Sequencing, Memory and Language Skills.
Simple engaging tasks to develop number and colour recognition as well as sequencing skills: Can you find number 2, 4, 5, etc? Give the children the blank cubes and ask them to write the numbers on them to practise recognition and number formation. What colour is number 12, 8, 11, etc? Can you order the numbers 1-5, 1-1-, 1-15, 1-20, etc. Can you order numbers backwards 10-0, 20-0, etc? Look at the numbers 1-10, remove a number. Which number is missing?
Extension: Can you find all the odd numbers? Can you find all the even numbers? Can you choose a number smaller/larger than 8, 14, 17, etc? Work on comparing numbers using more than/less than/equal to (<,>,=) symbols. Creating addition or subtraction sum sentences and then using manipulatives to support solving.
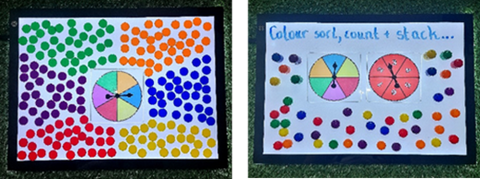
Counting, sorting, colour and number recognition, stacking.
Work on discriminating, recognising, naming and choosing colours. Repeat activity with different coloured objects for generalisation of colour recognition skills. Can the children choose all the yellow/blue/green? Can they stack them (FMS)? How many of each colour do we have? Counting and grouping them, sorting by colour. Taking turns to spin the wheel to see what colour you get.
Extension: Spin the colour wheel, then the number wheel. Can children recognise the numbers? Can they relate this to quantities and colour? Can they find, count out and stack the correct colour and correct amount? Who has the most/least counters at the end of the game? Compare the colour stack piles? How many red/blue/green? How many red and blue? How many more yellow than green? How many altogether? If 4 yellow fall off, how many are left?

Shape exploration, identification, visual perception, hand-eye coordination, imaginative play, language development.
Developing our understanding of 2D shapes; naming, recognising, investigating properties. Can you find a...? How many squares/triangles are there? Spin the wheel and find that shape? What patterns can you create with your shapes?
Extension: Investigating tessellation. Which shapes can tessellate? Visual perception: Can you copy shape/tangram pictures using an overlay/without and overlay? Imagination: Can you create your own pictures using these shapes? Use your imagination to tell me about your pictures? What is happening? Tell me a story about your picture? Write/record what is happening.

Phonics, letter recognition, word study, alphabetical ordering.
Phonics: Letter recognition: Write the letters (lower or uppercase on the cubes) and ask children to find a letter by name or sound. Can they match lowercase to upper case? Can they think of a word starting with a given initial sound? Let the children practise writing letters on the cubes. Write 6 letters on the cubes and roll the cube like a dice? What sound/letter did it land on? Can you think of a word with this sound/letter as the initial or ending sound? Can you match the lower and upper case letters?
Word study: Looking at CVC words and words missing the middle vowel sound. What words can you make? Which vowel is missing? Sound out the words and practise oral blending. Give the children a range of letter/sounds on the blocks and ask them to sound out and spell CVC words.
Extension: Can the children put the letters into the correct alphabetical order? Sing the alphabet together once they are ordered correctly. Can they make an alphabetical list of items using their alphabet to support them?

Fine Motor Skills, STEM, Listening Skills, Imitation Skills.
Here we used our old Quality Street Wrappers for some super FMS work; scrunching them up between our fingers and palms, smoothing them out, folding them, twisting them, etc and then exploring how different they looked with the light panel backdrop. The kids loved exploring the colour changes as the colours overlapped so this added a lovely Art and sensory exploration element to it.
They also had great fun using our translucent cogs to build 3D sculptures, another great way to develop pressure skills and bilateral co-ordination skills as they worked to build their art pieces. As I model and build, I talk through my design, what I am doing, making and describing it as I go. The children hear this language being modelled and then recreate themselves, often times making the same model and then as they build up their confidence and imagination they begin to create their own and bring their own ideas to life using their language to name, describe and create their own small worlds in which they can play.
Extension: Complete the activities as listening skills exercises, telling them which colour sweet wrapper to choose, what to do, practise imitation skills or following a verbal/visual instruction. Give them verbal instructions explaining how to make a 3D model using the cogs or give them a picture of a model already created to see if they can recreate the model themselves.

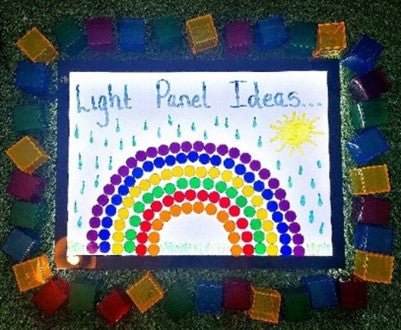
Mark making, pre-writing, tracing, drawing and letter formation.
As you can see on many of these photos, I used whiteboard markers to write directly onto the light panel screen. I found that they wiped off very easily with a dry cloth however I felt it necessary to provide the children with an overlay to write on as I didn't want the screen to become scratched over time (kids can put too much pressure on markers, especially if they are running out!) So instead, I used some of my A4 coloured and clear cellophane sheets as an overlay over which the children could mark make, draw, follow and create patterns, practise letter formation, tracing over shapes, lines, and words to develop skills. I found this a brilliant way to encourage reluctant and even eager writers to mark make, practise formation, work on pressure, etc. Perfect for placing a sheet of a writing example on with an overlay sheet for the children to trace over as the light beneath makes it very clear for them to copy over. This was also a great way to give more writing opportunities in different areas such as the sensory room and the dark den. Using the different coloured overlays (which can be wiped clean and reused) also added an element of colour and sensory exploration which the children loved. They had fun experimenting with the different colours, overlaying them to find which colours mixed, similar to the sweet wrappers mentioned above, etc and cutting them up into smaller shapes to layer and explore.

Sensory Play and Exploration, Fine Motor Skills.
I couldn't possibly have a light panel in class without testing out the sensory elements and benefits. In truth, every activity I have shown here in this blog post as well as the countless others we have trialled in class have all had that extra element of sensory play simply because of the very nature of this resource. As I said at the beginning of this post, something that I really like about this resource is the adjustable brightness of the light source as well as how it acts as a motivating and reinforcing resource, enticing and encouraging children to seek it out and play with it and with whatever we have set out on it.
For some added sensory play, we used it with clear plastic bowls full of water beads on top, playing hide and seek style oral language and memory games and fine motor tools such as tweezers and scoopers. We used it with coloured rice in bowls as well as just rice placing on top of the panel (as above) and we experimented with water and food dyes. The children loved playing with the rice and used it as a FMS task making patterns, writing in it and creating their own little mazes to travel through. They were in awe watching our water dance (adult supervision and direction needed for this as the light panel is a plug in!) and they loved watching the water move and the dyes swirl and mix as they moved around. We even took a few paper prints from the dyes on the water. They loved exploring the translucency and opaqueness of objects that were placed on top of the light panel and exploring how colours can mix and change depending on the light source.
I hope you have enjoyed reading my thoughts on this resource and viewing some of my activity ideas. Hopefully, you will have gained a few insights and ideas into how you could use it in your own setting, as well as how to differentiate and extend a range of activities for different age and abilities whether using it at home or in a classroom environment. For me, this light panel has been a great addition to our classroom and I have no doubt that we will continue to use it to increase focus and engagement, to maintain children's gaze and attention as well as to explore and add even more of a sensory element to our everyday tasks in class.
As always, if you have any questions, you know where to find me, over on my Instagram Page, @asdcreationstationation where I will continue to share my ideas and activity suggestions with you all.
Lisa x